Network Troubleshooting for Technicians
Posted on / 12 Jan 2015

Computer networks can be complicated things, with a lot of points of failure. As with all fault finding - a consistent, logical, and methodical approach is key to solving any connectivity issues you may have.
Starting Out
Sometimes, knowing where to start and knowing what each kind of fault looks like is all that’s required.
This knowledge base article is written to give you a basic checklist from which to base your troubleshooting. It’s not intended as a comprehensive checklist, but more of a demonstration of troubleshooting techniques to be applied as you see fit.
So, you’re having network difficulties. In this example network, let’s say that we have a wireless router sat at FoH control, connected (via wireless) to a Pro2, an engineer’s iPad, and to the engineer’s Mac computer, and none of these things can see the other. Oh dear…
Step One – Connections
It may seem obvious, but it really is worth checking all of the connections used in the system. So, the basic questions:
Are they of the right type (straight-through vs crossover – almost certainly you want it to be straight-through)? This matters less with modern hardware, as it’s generally capable of detecting what type of cable is used, and switching internally, but can still be a sticking point with legacy hardware.
Are they plugged into the correct ports? In this case, a LAN port (as opposed to a WAN port) on our wireless router, and the LAN Control port on the Pro2, rather than one of the AES ports.
Is the network hardware powered on? it’s worth noting that modern routers can sometimes take several minutes to boot and start transmitting data after being power cycled.
Many RJ45 connections on routers and switches nowadays have two lights above them – one green, and one amber. These can have different meanings depending on your hardware (and indeed, different colours as well). Most commonly, a green LED indicates a good link between the hardware at each end of the cable. The amber LED will flash when there is activity on the port.
It’s worth carrying a Cat5 cable tester in your toolkit. These tools will allow you both to check that a cable has no breaks in it, and that it’s wired correctly. I’ll talk about wireless connections a little later in this article.
Step Two – Addressing
So, our system is definitely connected together properly. We need to make sure that each of our hosts (this is the term for a device on a network) has the correct IP address and subnet mask in order to talk to the rest of the hosts on the network.
If we have a DHCP server on our network (and it is likely that we do, considering that most wireless routers are configured to act as such), we must ascertain that newly-connected hosts are receiving the correct information. This can be diagnosed with any laptop. I will be providing instructions for both Windows and Mac systems.
Windows
- With our physical connections proved, on your laptop, open the ‘network connections’ pane. In Win7, this can be reached via Start>Control Panel>Network and Sharing Center>Change Adapter Settings (left hand pane). This screen gives a list of all of our available networking devices, both physical and virtual.
- Right-click the relevant network connection. In the case of a Cat5 connection, this will likely be called ‘Local Area Connection’. Choose ‘Properties’.
- Single-click on the item labelled ‘Internet Protocol Version 4 (TCP/IPv4), and then click on the ‘Properties’ button underneath.
This new dialogue box allows you to set your computer’s IP address information. In this case, using a DHCP server, you should make sure that it is set to ‘Obtain an IP address automatically’, and also to ‘Obtain DNS server address automatically’. Click OK on all of these boxes.
The computer will now think for a little while, and all being well, it should obtain an IP address from the DHCP server.
Mac OS X
- Open the Network Preferences panel (Apple menu>System Preferences>Network) and click on the relevant network connection.
- In the case of a Cat5 connection, this will be Ethernet (left hand pane). The ‘Configure IPv4’ option should be ‘Using DHCP’.
- If there isn’t a valid IP address you can try clicking on ‘Advanced’ in this window, then ‘Renew DHCP lease’.
Troubleshooting DHCP
Troubleshooting a faulty DHCP server configuration is beyond the scope of this article. Suffice it to say, if your computer is not getting an IP address from your DHCP server, it will have a self-assigned IP address. These will usually take the form 169.xxx.xxx.xxx. If this is the case, and you’ve exhausted all other options, it may be that there is a fault with the DHCP server. In order to get your gig running, give every host its own static IP address, and in the longer term, look for someone who can bugfix your DHCP configuration.
Step Three – Ping
With everything connected and addressed correctly, it’s very likely that your network is ready to run. If it isn’t, there could be some strangeness happening at a higher level (for example, a bug in whatever remote control software you’re using for your desk). A way of diagnosing that you definitely have a good data connection to your intended host is to use the ping tool. It sends a single data packet across the network (ping), and waits for a response (pong). Here’s how it’s used:
Windows
- From the desktop of your machine, hit the windows key and ‘R’ on the keyboard. This will bring up the ‘Run’ dialogue prompt.
- Type the following: cmd
- This will bring up a scary-looking window of grey text on a black background. Don’t panic!
- Now we need to choose a host to ping. It’s a good idea to start with your DHCP server, to verify that particular link. Assuming that your DHCP server is reachable at 192.168.1.1, type: ping 192.168.1.1.
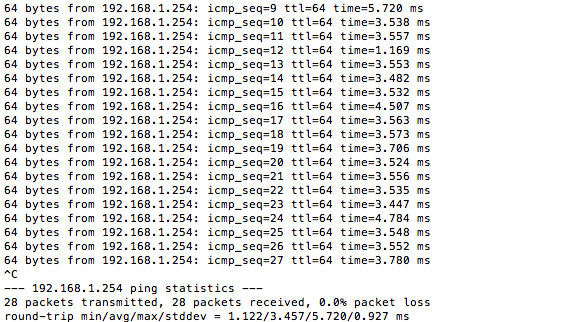
- If the link is good, you’ll see something like the image below.
- If the link isn’t good, you’ll see something different. The text can sometimes give a clue as to where the fault lies, but is usually pretty useless. This is the point where you need to start doublechecking all of your connections. It’s also worth restarting as much of your network as possible, starting with the router.
- With that link established as being good, you can now start to test routes to other hosts on your network (for example, your mixing console). Find the IP of the mixer (it will tell you in its network setup page), and try to ping that. If it responds as above, then the fault is not with the network. If it doesn’t respond, then the fault lies somewhere between the mixer and the router.
Mac OS X
- Hit the Apple key and the spacebar at the same time.
- In the Spotlight window which should have just appeared, type ‘Terminal’, and hit enter. This should launch the Terminal application, a scary looking window of black text on a white background. Don’t panic!
- Now we need to choose a host to ping. It’s a good idea to start with your DHCP server, to verify that particular link. Assuming that your DHCP server is reachable at 192.168.1.1, type: ping 192.168.1.1.
- Once you have your results, hit ctrl+C to stop ping from running, then quit Terminal as normal.
- If the link is good, you’ll see something like the image below.
- If the link isn’t good, you’ll see something different. The text can sometimes give a clue as to where the fault lies, but is usually pretty useless. This is the point where you need to start doublechecking all of your connections. It’s also worth restarting as much of your network as possible, starting with the router.
- With that link established as being good, you can now start to test routes to other hosts on your network (for example, your mixing console). Find the IP of the mixer (it will tell you in its network setup page), and try to ping that. If it responds as above, then the fault is not with the network. If it doesn’t respond, then the fault lies somewhere between the mixer and the router.
These three overall steps are the ones I take whenever I am unable to connect to a particular host on my own networks. They are usually sufficient for me to resolve whatever issue I’m having.
Sometimes, I find it worthwhile to use other tools to more accurately diagnose whatever fault is present. I list these tools below:
Nmap/Zenmap GUI
Nmap is a very powerful network scanner used by network security specialists to analyse hosts on whichever network they’re testing. It’s a command line tool, but is available for Windows with Zenmap, which gives it a graphical interface. I use it typically to scan my particular subnet to identify the IP addresses of various hosts, and sometimes to scan individual hosts to check for security holes, usually in a corporate setting.
Totusoft LAN Speed Test Lite
LSTL allows me to check the speed of my network locally. It’s useful for diagnosing slightly-faulty networks, and checking the throughput when you’re using a venue’s own point-to-point patching.
Ping -t flag (Windows)
You may have noticed that Windows’ ping only sends out four requests. What if you have an intermittent fault that you’re trying to diagnose? This is where you can use the ‘-t’ flag within ping – it pings until termination. Usage is much the same – ping -t 192.168.1.1. This will keep pinging the specifed host until told to stop, which allows you to wiggle some cables and see if the connection is interrupted. Ping on OS X does this automatically.
Notes on Wi-Fi
There’s something to be said for the convenience and usefulness of being able to perform your system setup or focussing through a mobile phone or tablet. Wireless connections for show networks are very much the norm in the present day, and with that comes an additional set of challenges when troubleshooting inoperative networks. The majority of the article still holds true for wireless connections, and it is easiest in your troubleshooting to treat wireless as a slightly more complex cable.
Ascertaining the quality of a wireless connection relies on a number of other factors:
Range – Are you close enough to the wireless access point for there to be good signal? This range will be reduced if the access point’s antenna is buried in a dogbox or production rack.
Encryption – There are a number of different forms of wireless encryption, used to stop people from listening in on your communications, and interrupting them maliciously. When you set up your wireless network, you should use WPA2-Personal authentication with a pre-shared key. This key will be the wireless network’s password.
Competing Signals – There is wireless everywhere in the world. If your network is being set up in the middle of a city or large town, or at a conference centre, or even in some cases a multifunction arts venue, it could be that you are sharing the airwaves with another network, or several. This will reduce the functional range and speed of your own wireless network. You can alleviate this somewhat by performing a scan of the wireless spectrum (more on this below), and setting your wireless network up on an unused or less-busy frequency, just as you would a radio mic.
Capacity – if you have the tour system, FoH, monitor, and lighting engineers all hitting the wireless at once to do their various configurations, it is quite possible that older (or cheaper) wireless routers simply do not have the capacity internally to deal with that much data. I suggest either upgrading your hardware, or scheduling your setup so that LX has time to make the sound department a cup of tea while they’re doing their system configuration…
You don’t need a comprehensive RF scanning tool to work out what channel to use for your wireless network. A modern smartphone is sufficient. I use an Android app called Wifi Analyzer, which allows me to do a site survey and find any gaps in the spectrum.
Any suggestions or corrections, questions or comments? Get in touch.
Ask a Quick Question
"*" indicates required fields
News from our Blog

Gigs and Global Warming
Posted / 1 Dec 2019

Concert Noise Management
Posted / 11 Nov 2019
Knowledge Base Articles
Crew Comms for Festivals and Concerts
Posted / 25 Jan 2019

Introduction to Networking
Posted / 14 Jan 2018
Equipment for Hire
Class 2 Calibrated Measurement System
£100.00 per day
£300.00 per week

Neumann KM184 Microphone
£12.00 per day
£36.00 per week